Getting a tattoo is exciting. The healing process after? Less glamorous — but understanding it is genuinely important. Misreading normal healing as a problem (or worse, mistaking an actual problem for normal healing) can affect both your health and the long-term quality of your tattoo. This guide walks through every stage of tattoo healing, week by week, so you know exactly what to expect.
The Short Version: Tattoo Healing Timeline
- Day 1: Fresh wound, wrapped, plasma and ink ooze
- Days 2–3: Redness, swelling, soreness — skin is in full repair mode
- Days 4–6: Surface begins to dry, itching starts
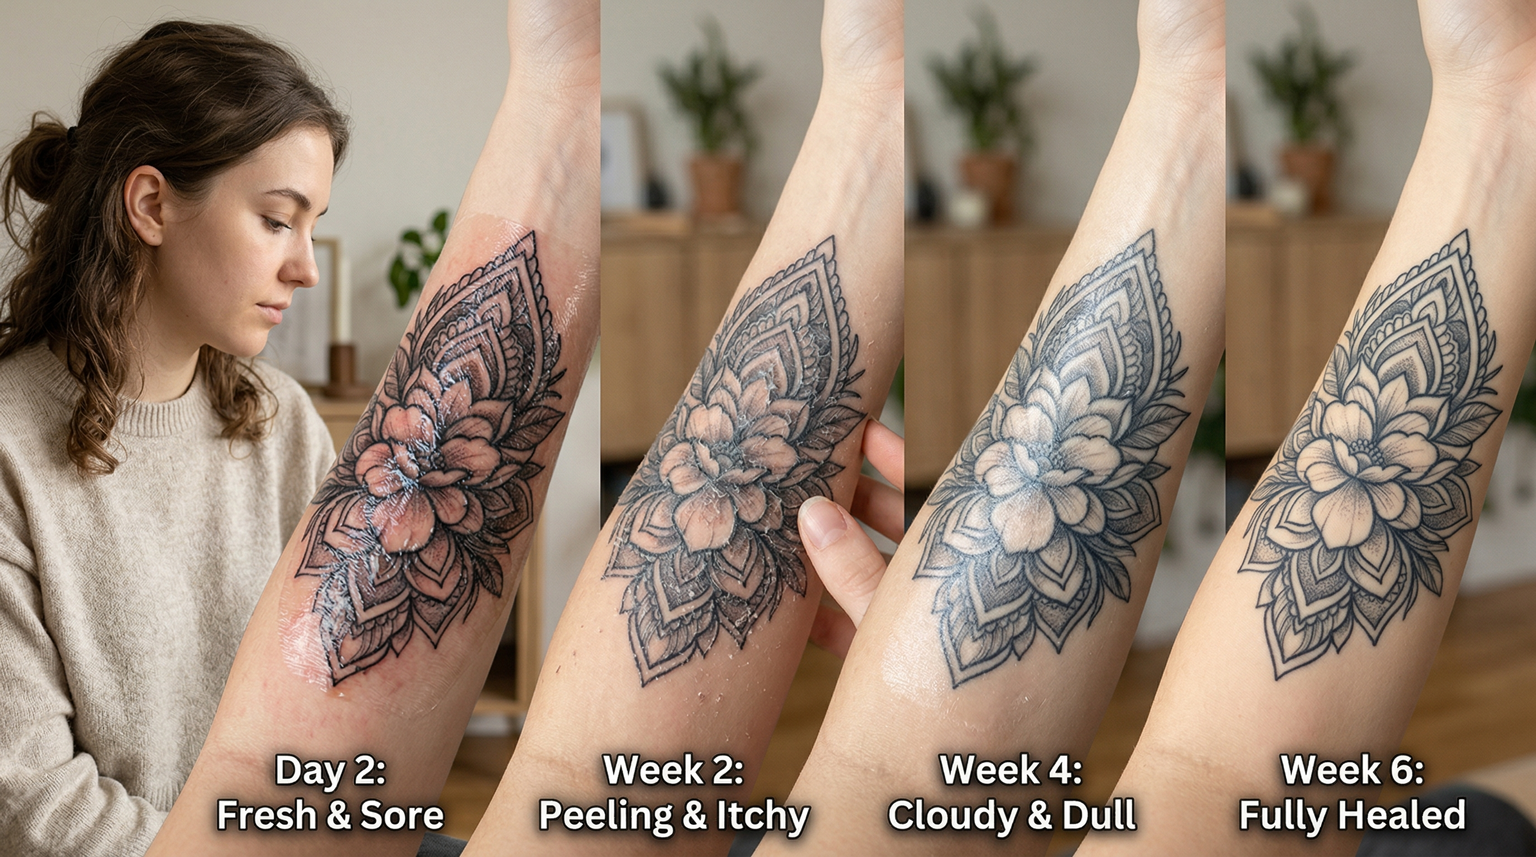
- Week 2: Peeling and flaking (the most stressful-looking stage)
- Weeks 3–4: Surface looks healed but looks slightly dull or "milky"
- Months 1–3: Subsurface skin finishes regenerating, true colors emerge
Most artists will tell you a tattoo is "healed" in two to four weeks. What they mean is surface healed. Full skin regeneration takes two to three months, sometimes longer depending on your skin type, the tattoo's location, and the depth and density of the ink.
Day 1: Right After Your Session
Your artist will clean the tattoo, apply a thin layer of aftercare product (ointment or a specialized product), and then wrap it — either with traditional plastic wrap or a breathable adhesive bandage like Saniderm or Tegaderm.
What you'll notice:
- Redness around the tattoo and in the surrounding skin
- Mild swelling, especially on areas with thin skin (wrist, ankle, collarbone)
- A warm, tender feeling — the area will feel like a sunburn
- Ink and plasma may pool under a wrap (normal — this is lymph fluid mixed with excess ink)
What to do: Follow your artist's wrap instructions exactly. If using a breathable bandage (Saniderm), you may be told to leave it on for 24–72 hours. If using standard plastic wrap, you'll typically remove it after 2–4 hours, gently wash the tattoo with fragrance-free soap and lukewarm water, pat dry with a clean paper towel, and apply a thin layer of unscented moisturizer or aftercare ointment.
Do not: Re-wrap with new plastic wrap for extended periods (it traps moisture and creates conditions for bacteria). Do not use hot water. Do not rub — pat only.
Days 2–3: Redness, Swelling, and Soreness
Your body is treating the tattoo as a wound, because that's exactly what it is. The needle punctures the skin thousands of times per minute, depositing ink into the dermis layer. Your immune system responds accordingly.
What's normal in this stage:
- Continued redness, soreness, and swelling — particularly for larger tattoos
- A weeping or "wet" surface with small amounts of plasma and ink residue
- The tattoo may look slightly raised or thick
- Mild bruising around the area, especially if the session was long
What's not normal: Excessive swelling that extends significantly beyond the tattoo, red streaks radiating outward from the tattoo, severe pain (not just soreness), fever, or pus. These can be signs of infection and warrant a visit to a doctor.
Keep gently washing twice a day (morning and night) and applying a thin layer of aftercare. Thin is the key word — a thick coat of ointment suffocates the skin and can actually slow healing.
Days 4–6: The Surface Starts to Dry
By days four through six, the weeping stage is usually over. The surface begins to dry out and the tattoo starts to feel tight. You'll likely notice:
- Skin feeling tight or slightly stiff when you move the area
- Itching beginning — sometimes mild, sometimes intense
- A faint whitish or cloudy film starting to develop over the tattoo
- Colors may look duller than they did fresh out of the shop (this is temporary)
The itching in this stage is one of the hardest parts of healing. Do not scratch. Scratching can pull out ink, damage healing skin, and introduce bacteria. If the itching is intense, lightly pat the area with a clean hand or apply a thin coat of aftercare to temporarily relieve the sensation.
Week 2: The Peeling Stage
This is the stage that worries new tattoo owners the most — and unnecessarily so. Around days 7–14, the outer layer of skin begins to peel and flake, similar to a peeling sunburn. The flakes often contain color and can make the tattoo look patchy, faded, or damaged.
What's happening: Your skin is shedding the outermost damaged layer. The ink is not in this layer — it's in the dermis below. The shedding is normal and necessary.
Critical rule: Let the skin peel on its own. Do not pick, peel, or pull at the skin. Peeling before the skin is ready pulls ink out with it, leaving permanent light spots or gaps in the tattoo.
Keep moisturizing regularly. Using an unscented lotion (not heavy ointment at this stage) helps soften the flaking and reduce itching without smothering the skin.
Weeks 3–4: The "Milky" Phase
Once the peeling is complete, the tattoo often enters a strange-looking phase where the ink looks duller, slightly hazy, or almost as if it has a thin layer of skin over it. This is called the "milky" or "cloudy" phase and it's completely normal.
What's happening: A fresh layer of skin has grown over the tattoo, and it's slightly opaque. As the skin continues to regenerate and thin out, the tattoo will brighten and become more vivid again. This process can take a few more weeks.
At this stage, the tattoo looks healed to most observers, and the artist will likely say it's healed for practical purposes. But the skin is still regenerating underneath.
Months 1–3: Subsurface Healing
True, complete healing happens below the surface over the next one to three months. During this period:
- The ink settles and the colors reach their final appearance
- Any remaining haziness clears as the new skin layer fully matures
- Fine line work, if present, can look slightly softer as it settles
- The skin regains its normal texture and elasticity over the tattoo
This is also the window when most artists recommend returning for a touch-up if needed. Touch-ups should not be done until the tattoo is fully surface-healed (minimum four to six weeks), and many artists prefer to wait the full three months.
Factors That Affect Healing Time
Not everyone heals on the same timeline. Key variables:
- Location: Areas with high movement (hands, elbows, feet) heal slower and are more prone to fading during healing
- Size and density: Large pieces with heavy saturation take longer to surface-heal than small line work
- Skin type: Drier skin tends to peel more aggressively; oily skin may stay weepy longer
- Age: Younger skin generally heals faster than older skin
- Health and immune function: Illness, poor sleep, stress, or compromised immune function all slow wound healing
- Sun exposure: UV damage during healing can destroy ink and cause permanent patchiness
- Aftercare consistency: Skipping moisturizer or washing too aggressively extends healing time
What to Avoid During the Entire Healing Period
- Sun exposure: No direct sunlight on a healing tattoo. Once healed, use SPF 50+ consistently
- Soaking in water: No swimming, baths, hot tubs, or saunas until fully surface-healed. Showers are fine
- Tight clothing rubbing the tattoo: Friction during healing causes ink to lift
- Gym and heavy sweating in the first week: Sweat is not sterile and can introduce bacteria
- Scratching or picking: Ever. No exceptions
- Petroleum-based products if you have oily or acne-prone skin: Can clog pores and cause pimples over the tattoo
Signs of Normal Healing vs. Signs of a Problem
Normal:
- Redness and swelling in the first 2–3 days
- Itching throughout weeks 1–2
- Peeling and flaking in week 2
- Dullness or cloudiness in weeks 3–4
- Small raised bumps along line work (often temporary)
See a doctor if you notice:
- Pus or thick discharge (not clear plasma — actual pus)
- Red streaks spreading outward from the tattoo
- Fever or chills
- Swelling that gets worse after day 3, not better
- A rash extending significantly beyond the tattoo area
- Extreme pain that is worsening, not improving
Tattoo infections are not common when proper aftercare is followed, but they do happen. When they do, they need medical attention — not just more ointment.
A Quick Aftercare Routine Summary
For the first two weeks, a basic routine looks like this:
- Wash gently with fragrance-free soap and lukewarm water, twice daily
- Pat dry with a clean paper towel (not a shared bathroom towel)
- Apply a thin layer of unscented aftercare — ointment for the first few days, switching to a light unscented lotion as the surface dries
- Avoid touching with unwashed hands
- Keep it out of direct sun, water, and tight fabrics
Your artist's specific aftercare instructions always take priority over any generic advice, including this article. Different techniques and skin types call for different approaches. If you're unsure whether something is normal, reach out to your artist directly — they've seen every stage of healing thousands of times and are your best resource.
Final Thoughts
Tattoo healing is not a passive process — what you do (and don't do) in the weeks after your session directly affects how your tattoo looks for the rest of your life. The investment of choosing a great artist and going through the session deserves to be protected with proper aftercare.
If you're still in the planning stage, Tattooed.co is a great place to browse artist portfolios and see healed examples of their work — the best predictor of how your tattoo will look long after the healing is done.